How to Use WP Sell Services REST API: 21 Controllers for Mobile App Developers

WP Sell Services exposes a full REST API covering all 21 controllers – from service listings and order management to provider accounts, reviews, and disputes. This guide is written for mobile app developers building Flutter or React Native clients against the WP Sell Services backend, covering authentication, endpoint structure, the order lifecycle, and common integration shapes.
Authentication: JWT vs App Passwords
WP Sell Services REST API supports two authentication methods: WordPress Application Passwords (built into core since WordPress 5.6) and JWT via the JWT Authentication for WP REST API plugin. For mobile apps, JWT is the preferred choice because tokens are short-lived and do not expose the user’s main account password. App Passwords are better suited for server-to-server integrations where token rotation is not required.
To authenticate with JWT: install the JWT Authentication for WP REST API plugin, add the JWT secret key to wp-config.php, and exchange user credentials for a token via POST to /wp-json/jwt-auth/v1/token. The token is included as a Bearer token in the Authorization header of subsequent requests. Token expiry is configurable; 24 hours is standard for mobile apps with automatic refresh.
Authentication Header Format
All authenticated requests to the WP Sell Services REST API require the Authorization header with a valid token. Unauthenticated requests to public endpoints (service listings, categories, provider profiles) work without a token. Buyer-specific endpoints (orders, messages, reviews) and provider endpoints require authentication. Admin endpoints require admin-level authentication.
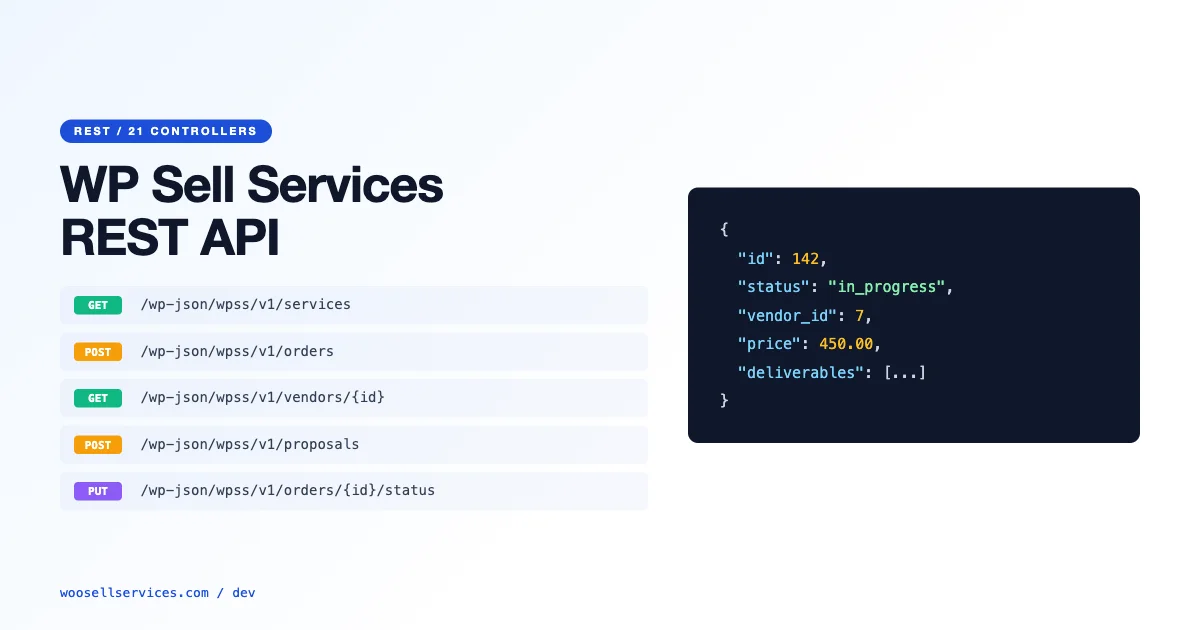
The 21 Controllers: What Each One Covers
| Controller | Base Endpoint | Auth Required |
|---|---|---|
| Services | /wp-json/wss/v1/services | No (GET), Yes (POST) |
| Orders | /wp-json/wss/v1/orders | Yes |
| Providers | /wp-json/wss/v1/vendors | No (GET), Yes (POST) |
| Categories | /wp-json/wss/v1/categories | No |
| Reviews | /wp-json/wss/v1/reviews | Yes |
| Disputes | /wp-json/wss/v1/disputes | Yes |
| Messages | /wp-json/wss/v1/messages | Yes |
| Packages | /wp-json/wss/v1/packages | No (GET), Yes (POST) |
| Proposals | /wp-json/wss/v1/proposals | Yes |
| Deliveries | /wp-json/wss/v1/deliveries | Yes |
| Payments | /wp-json/wss/v1/payments | Yes (Admin) |
| Commissions | /wp-json/wss/v1/commissions | Yes (Admin) |
| Withdrawals | /wp-json/wss/v1/withdrawals | Yes |
| Notifications | /wp-json/wss/v1/notifications | Yes |
| Tags | /wp-json/wss/v1/tags | No |
| Media | /wp-json/wss/v1/media | Yes |
| Search | /wp-json/wss/v1/search | No |
| Reports | /wp-json/wss/v1/reports | Yes (Admin) |
| Settings | /wp-json/wss/v1/settings | Yes (Admin) |
| Webhooks | /wp-json/wss/v1/webhooks | Yes (Admin) |
| Users | /wp-json/wss/v1/users | Yes |
Order Lifecycle: Endpoints at Each Stage
A WP Sell Services order moves through these status stages: pending, active, in_revision, delivered, completed, cancelled, and disputed. Each transition is triggered by a specific REST endpoint or webhook event. Mobile apps need to handle all stages gracefully.
- Order placement: POST /wp-json/wss/v1/orders – creates the order, returns order_id and payment_url
- Order acceptance (provider): PUT /wp-json/wss/v1/orders/{id}/accept – transitions to active
- Delivery submission (provider): POST /wp-json/wss/v1/deliveries – attaches delivery files, transitions to delivered
- Revision request (buyer): POST /wp-json/wss/v1/orders/{id}/revision – transitions to in_revision
- Order completion (buyer): PUT /wp-json/wss/v1/orders/{id}/complete – transitions to completed, triggers payout queue
- Dispute opening: POST /wp-json/wss/v1/disputes – creates dispute, transitions to disputed, freezes payout
Provider Endpoints: Onboarding and Profile Management
Provider registration via the API creates a provider account with profile fields, service categories, and payout information. The provider profile endpoints cover: profile CRUD, service management, package management, portfolio uploads via the Media controller, and earnings/withdrawal management.
For mobile onboarding flows, the typical sequence: user registers (standard WordPress user registration), then upgrades to provider status via POST /wp-json/wss/v1/vendors with the profile_data payload. This triggers the admin review workflow if provider approval is enabled in WP Sell Services settings. The GET /wp-json/wss/v1/vendors/{id}/status endpoint returns the current approval state, which mobile apps should poll or handle via webhook.
Buyer Endpoints: Service Discovery and Purchase Flow
The buyer-facing API covers service search and discovery, package selection, order placement, messaging, delivery review, and completion. The search endpoint supports filtering by category, price range, delivery time, provider rating, and keyword. Pagination is cursor-based, returning a next_cursor value for infinite scroll implementations.
The order placement flow for a mobile app: GET /services/{id}/packages to retrieve available packages and pricing, POST /orders with the selected package_id and any custom requirements field, handle the returned payment_url (redirect to payment gateway or use in-app browser), then poll GET /orders/{id} or listen to the wss_order_status_changed webhook for status updates.
Webhook Integration for Real-Time Updates
The Webhooks controller lets you register endpoint URLs that receive POST requests on specific events. Key webhook events for mobile app backends: wss_order_placed, wss_order_accepted, wss_order_delivered, wss_order_completed, wss_dispute_opened, wss_message_sent, wss_review_submitted. Each webhook payload includes the event type, timestamp, and full object data (order, dispute, message) in JSON format.
For Flutter and React Native apps, the practical approach is to have a backend server receive webhooks and push real-time notifications to the mobile client via FCM (Firebase Cloud Messaging) or APNs. Direct mobile webhook handling is not possible since mobile apps do not have publicly accessible URLs. The architecture: WP Sell Services webhook fires to your backend, backend processes and pushes to FCM, mobile app receives push notification and fetches updated data via REST.
Flutter Integration Pattern
A Flutter client for WP Sell Services follows a standard pattern: a service layer that wraps the REST API calls, a state management layer (Riverpod or BLoC recommended) that holds the authenticated user state and order list, and a UI layer that reacts to state changes. The JWT token is stored in Flutter’s secure storage (flutter_secure_storage) and refreshed before expiry.
Error handling deserves attention: WP Sell Services returns standard HTTP status codes (401 for auth failure, 403 for permission denied, 404 for missing resources, 422 for validation errors with field-level error messages in the response body). Mobile apps should handle each status code with appropriate UI feedback – 401 triggers re-authentication, 422 surfaces field-specific errors to the user.
React Native Integration Pattern
React Native apps typically use Axios or the Fetch API for REST calls, with React Query or SWR for data fetching, caching, and refetching. A custom Axios instance pre-configured with the base URL, JWT token interceptor (adds Authorization header automatically), and response interceptor (handles 401 by refreshing token) covers most of the HTTP infrastructure.
For the provider dashboard in a React Native app, the key screens map directly to API controller groupings: My Services (Services controller), My Orders (Orders controller filtered by provider), Earnings (Commissions + Withdrawals controllers), Messages (Messages controller), and Reviews (Reviews controller). Each screen’s data requirements are well-defined by the controller’s GET endpoints.
Rate Limiting and Performance
WP Sell Services REST API inherits WordPress’s API rate limiting behavior – by default, there is none. For production mobile apps, you must implement rate limiting at the server level (Nginx rate limiting, Cloudflare rate limiting, or WordPress plugin-level rate limiting). Mobile apps that make unbounded API calls (for example, polling every second) will exhaust server resources on shared hosting.
Recommended polling intervals for mobile: order status – 30 seconds when an order is in a transitional state, 5 minutes otherwise. Message inbox – 60 seconds while the app is in foreground, disabled in background (use push notifications instead). Service listing – cache for 5 minutes, invalidate on explicit user refresh. These intervals balance responsiveness with server load.
For operators running service marketplaces on top of WP Sell Services, understanding the full order and service management architecture is essential. The companion guide on loyalty and rewards plugins covers how to layer retention mechanics on top of a service platform. For complete reference including all hook and filter points, see the hooks and filters developer guide.
Pagination and Filtering in Service Listing Queries
Service listing endpoints return paginated results by default. The per_page parameter controls page size (default: 10, maximum: 100). For mobile apps displaying service listings, use cursor-based pagination rather than page number pagination to avoid issues with data consistency during scroll – if a new service is added while the user is scrolling, page-number pagination shifts results and creates duplicates. The API returns a next_cursor value in the response when more results are available; pass this cursor as the after parameter in the next request.
Filtering the service listing is done via query parameters: category filters by category slug, min_price and max_price filter by package price range, delivery_time filters to services with delivery within N days, and provider_rating filters by minimum average rating. Multiple filters combine with AND logic. For search with filtering, use the search controller endpoint rather than the services endpoint – search returns relevance-ranked results, while services returns chronological or rating-based results.
Handling Media Uploads via the API
The Media controller handles file uploads for both provider portfolio items and order delivery attachments. File uploads use multipart/form-data rather than JSON – the only endpoint in the WP Sell Services API that differs from the standard JSON body format. Mobile apps upload files using their platform’s multipart upload implementation: URLSession in iOS, HttpClient with MultipartBody in Android, and the http package’s MultipartRequest in Flutter.
File size limits on media uploads are controlled by WordPress’s upload_max_filesize and PHP’s post_max_size settings, not by WP Sell Services itself. For marketplaces where providers deliver large files (design source files, video exports), coordinate with your hosting provider to set appropriate limits. The API returns a 413 error code when files exceed the configured limit, which mobile apps should surface as a clear error message with the actual file size limit.
Testing the API with Postman
Before writing mobile app code, test the WP Sell Services REST API endpoints in Postman. Create a Postman collection with the base URL, authorization header (Bearer {JWT_TOKEN}), and environment variables for your token and base URL. Test the complete order flow: authenticate, fetch services, create an order, accept it (provider token), submit delivery (provider token), complete it (buyer token). This end-to-end test in Postman confirms your API configuration is correct before you write a line of mobile code.
The Postman collection also serves as living documentation for your API integration – team members can import the collection and have a working API reference immediately. Export the collection as a JSON file and commit it to your project repository. For mobile app teams where multiple developers are building different screens in parallel, this shared Postman collection prevents duplication of authentication and request setup work across the team.
For the development team using WP Sell Services, the hooks and filters guide provides the server-side extension points that complement the REST API for server-to-server integrations. For marketplace operators evaluating the full WP Sell Services architecture before committing to development, the marketplace plugin comparison covers how WP Sell Services compares to alternatives at the architectural level. For setting up the payment infrastructure the API uses for order transactions, see the installment payment guide for supported payment flow configurations.
Rate Limiting and API Abuse Prevention
Public-facing APIs on WordPress sites are targets for abuse: excessive polling, credential stuffing against the authentication endpoint, and automated order creation to test payment flows. Implement rate limiting on the WP Sell Services REST API endpoints using a WordPress-level solution (the WP REST API rate limiting mu-plugin shape) or at the infrastructure level via NGINX or Cloudflare Rate Limiting rules.
For the authentication endpoint specifically, limit failed authentication attempts to 5 per minute per IP. This threshold blocks brute-force credential attacks without affecting legitimate users. For order creation endpoints, limit to 10 requests per minute per authenticated user – legitimate mobile apps rarely need to create more than one order per session. Document these limits in your API documentation so mobile developers can design their request shapes accordingly.
Handling Token Expiry in Mobile Applications
JWT tokens issued by the WP Sell Services authentication endpoint have a configurable expiry. Mobile applications that do not handle token expiry correctly will fail silently: the user sees a loading spinner, the API returns a 401, and the app has no recovery path. Implement token refresh logic in your mobile client before shipping to production.
The token refresh shape for mobile apps: store the JWT token and its expiry timestamp at login. Before every API request, check whether the token expires within the next 60 seconds. If it does, request a new token using the refresh endpoint before making the primary request. If the refresh fails (token has been revoked, user changed their password), redirect the user to the login screen with a clear message. This shape eliminates expired-token failures from the mobile experience without requiring the user to log in repeatedly.
Versioning Your API Integration
WP Sell Services REST API endpoints may change between plugin versions. Build version awareness into your mobile integration from the start: include an API version check at app launch that calls the version endpoint and compares the server’s plugin version against the minimum version your app supports. If the server version is below your minimum, display a notification to the marketplace operator that their plugin version is incompatible with the current app version.
Document which WP Sell Services version introduced each API feature your app depends on. This compatibility matrix prevents silent failures when marketplace operators update the plugin and inadvertently remove an endpoint your mobile app relies on. For features your app uses that are not part of the stable REST API surface (custom post meta, provider-specific fields), use defensive coding: always check whether the expected field exists in the response before accessing it, and provide fallback behavior when it does not.
Push Notifications for Order Status Changes
Mobile marketplace apps benefit significantly from push notifications on order status changes. When a buyer’s order is accepted, delivered, or completed, a push notification keeps them engaged without requiring the user to open the app to check status. Implement push notifications by connecting WP Sell Services action hooks (wss_order_accepted, wss_delivery_submitted, wss_order_completed) to a push notification service (Firebase Cloud Messaging for Android, APNs for iOS).
The server-side implementation: a WordPress plugin that hooks into WP Sell Services order events, looks up the buyer’s push notification token stored in user meta at login, and sends the push notification via the FCM or APNs HTTP API. Store device tokens in user meta when the mobile app authenticates: the login endpoint response includes user ID, and the app immediately registers the current device token against that user ID via a custom endpoint. This ensures push notifications follow the user across device changes and reinstalls.