How to Launch a Freelance Marketplace Like Fiverr on Your Own Website in 2026

I built a Fiverr-style marketplace on my own domain last year. No platform fees, no revenue share, no Fiverr deciding who gets promoted in search. Every dollar a buyer spends lands in my Stripe account. If you want the same setup, this is the guide I wish I had.

Why Own Your Marketplace Instead of Listing on Fiverr
Fiverr takes 20% from sellers and charges buyers an additional service fee on top. Run the math on a $500 project: the buyer pays $525, the seller receives $400, and Fiverr pockets $125 for facilitating one transaction.
On your own marketplace, that $125 stays inside your business or gets split with your sellers as a better payout rate. That is the first and most important reason to launch your own Fiverr alternative on your own website.
Beyond the fees, there are three other reasons that matter just as much:
- Customer data belongs to you. Fiverr owns the buyer relationship. On your site, you collect emails, purchase history, and behavioral data. You can run email sequences, create loyalty tiers, and re-market to buyers without competing against Fiverr’s own promoted listings.
- Brand control. Your marketplace looks like your brand, not a Fiverr page. Buyers build trust with your domain, not with a platform that might change its terms tomorrow.
- Seller quality control. You decide who sells on your marketplace. No algorithm-driven demotion, no review manipulation from competitors, no race to the bottom on pricing.
The Stack: WordPress Plus WP Sell Services Pro Agency
Here is what you actually need to launch a freelance marketplace like Fiverr:
| Component | Tool | Cost |
|---|---|---|
| CMS and store engine | WordPress + WooCommerce | Free |
| Service marketplace layer | WP Sell Services Pro Agency | $99/yr |
| Payments | Stripe Connect (built in) | Stripe fees only |
| Hosting | Any managed WordPress host | $20-50/mo |
| Theme | Storefront or any WooCommerce theme | Free or paid |
WP Sell Services is built by the team at wbcomdesigns.com, which has been building BuddyPress and WooCommerce extensions since 2014. The Pro Agency tier unlocks the multi-vendor payout system, seller levels, and commission controls that you need for a true Fiverr alternative on your own website.
Step 1: Install WordPress and WooCommerce
Start with a clean WordPress install. WooCommerce is the transaction backbone and WP Sell Services builds on top of it. Install WooCommerce from the plugin directory, run the setup wizard, and connect a Stripe or PayPal gateway before you touch anything else.
Key WooCommerce settings to configure before adding WP Sell Services:
- Set your currency and payment gateways
- Enable guest checkout (many gig buyers do not want to create accounts)
- Set up email notifications for orders and refunds
- Configure tax settings for your jurisdiction
Install WP Sell Services Pro Agency
Download the plugin from store.wbcomdesigns.com/wp-sell-services/. Upload via Plugins > Add New > Upload. Activate, then navigate to WP Sell Services > Settings to begin configuration.
Step 2: Configure Stripe Connect for Multi-Vendor Payouts
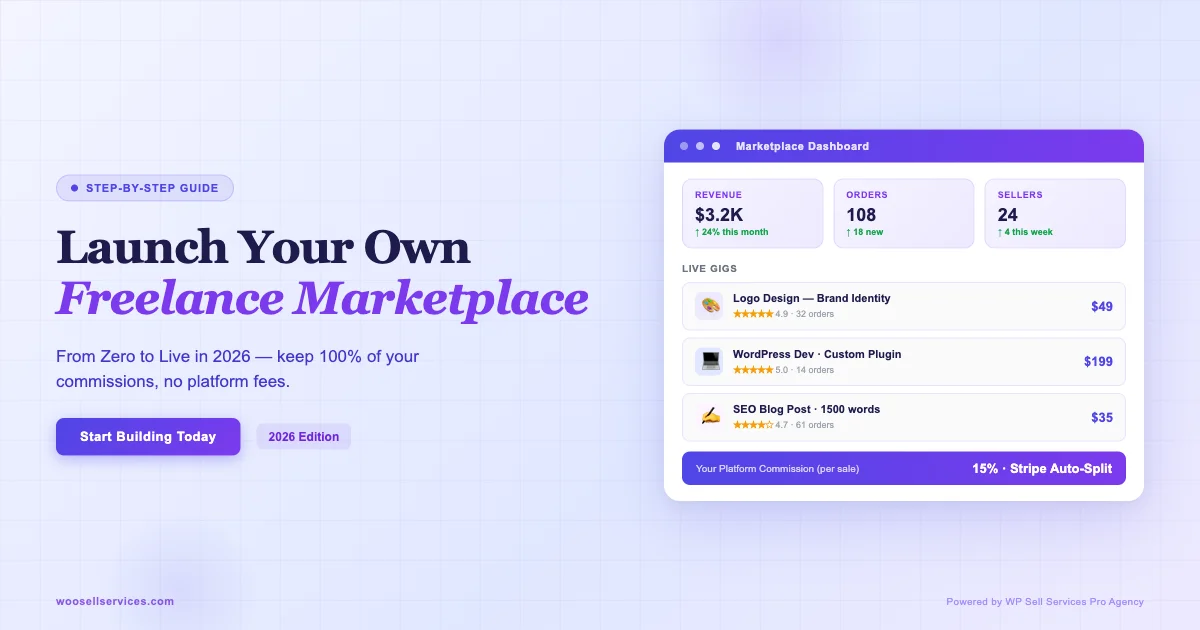
This is the step that separates a simple service shop from a real marketplace. Stripe Connect lets your sellers connect their own Stripe accounts. When a buyer pays, Stripe splits the payment automatically: your commission percentage goes to your Stripe account and the seller’s share goes directly to theirs. No manual bank transfers, no holding funds, no disputes about when sellers get paid.
Setup steps inside WP Sell Services:
- Go to WP Sell Services > Payments > Stripe Connect
- Enter your Stripe platform API keys (from your Stripe dashboard under Connect)
- Set your platform’s default commission rate (example: you keep 15%, sellers receive 85%)
- Enable the seller onboarding flow so new vendors see a “Connect with Stripe” button in their dashboard
- Test with a Stripe test-mode transaction before going live
Once Stripe Connect is active, buyers see a normal checkout. The payment split happens in the background. Your sellers are never waiting on you to manually send their cut.
Step 3: Set Commission Tiers
Flat commissions work fine at launch, but commission tiers give you a powerful incentive tool. You can reward top sellers with lower fees, which keeps them on your platform rather than leaving for a competitor or going direct with buyers.
A simple starting structure:
| Seller Tier | Monthly Revenue on Platform | Your Commission | Seller Keeps |
|---|---|---|---|
| New Seller | $0 – $499 | 20% | 80% |
| Level 1 | $500 – $2,999 | 15% | 85% |
| Level 2 | $3,000 – $9,999 | 10% | 90% |
| Top Seller | $10,000+ | 5% | 95% |
Even at a 20% commission on new sellers, you are still competitive with Fiverr at the buyer level because you are not adding a buyer-side service fee. The buyer pays what they see listed. That transparency alone drives conversions.
Step 4: Define Seller Levels
Seller levels serve two purposes. First, they give buyers a trust signal without you having to manually vet every seller profile. Second, they motivate sellers to increase their volume and quality because there are visible rewards for doing so.
WP Sell Services lets you configure seller level criteria in the admin. Tie levels to criteria like:
- Number of completed orders (example: 10 orders to reach Level 1)
- Average review score (example: minimum 4.5 stars to maintain Level 2)
- Account age (example: active for 60+ days)
- Zero disputes in the last 90 days
Display the level badge on seller profiles and gig listings. Buyers read these signals before purchasing, the same way they read Fiverr’s “Top Rated” labels.
Step 5: Enable Browse-and-Buy Mode with Gig Templates
Fiverr’s core UX is browse-and-buy: a buyer lands on a category, scans gig cards, clicks one, adds to cart, pays. You want the same experience on your site, not a quote-request flow that requires back-and-forth before a buyer can purchase.
WP Sell Services supports this through its service listing structure. Each seller creates a gig as a WooCommerce product with fixed pricing tiers (Basic, Standard, Premium) and delivery times. Buyers can add any tier directly to the cart. For a detailed look at how service businesses are using this same plugin across different niches, see 7 service businesses you can launch with WP Sell Services.
Create Gig Templates for New Sellers
A gig template is a pre-built service listing structure that new sellers fill in rather than building from scratch. This speeds up onboarding and keeps listing quality consistent. Create templates for your top categories:
- Logo design (title formula, 3-tier pricing structure, FAQ template)
- WordPress development (scope checklist, delivery time ranges)
- Content writing (word count tiers, revision policy)
- Video editing (format specs, revision rounds)
When a new seller joins, they pick a template and customize it. You get consistent, buyer-friendly listings without manually editing every submission.
Step 6: Build Your Category Structure
Start narrow. A marketplace that tries to cover everything on day one looks empty and unfocused. Pick three to five service categories where you know there is buyer demand and seller supply.
Good starting category structure for a general freelance marketplace:
- Design (Logo, Brand Identity, Social Media Graphics)
- Development (WordPress, Web Apps, Shopify Customization)
- Writing (Blog Posts, Copywriting, Product Descriptions)
- Video (Editing, Animation, Subtitling)
- Marketing (SEO Audits, Email Campaigns, Ad Management)
Set up WooCommerce product categories to match. Use subcategories for popular service types. This structure also feeds your internal SEO since each category page can rank for “hire [service type]” searches over time.
Step 7: Configure the Review System
Reviews drive conversions on any marketplace. A seller with 47 five-star reviews closes more gigs than a new seller with zero, regardless of price or portfolio quality. Set up a review flow that triggers automatically after order completion.
WP Sell Services integrates with WooCommerce’s native review system. Configure it to:
- Send an automated review request email 24 hours after order delivery is marked complete
- Allow star ratings plus a text comment
- Display aggregate star ratings on gig listing cards (not just on the product page)
- Flag reviews below 3 stars for admin review before publication
You can also allow sellers to leave public replies to reviews. This is visible to future buyers and is one of the strongest trust signals on any marketplace.
Step 8: Set Up Dispute Resolution
Disputes happen on every marketplace. A buyer says work was not delivered. A seller says scope was changed mid-project. You need a clear process before your first dispute arrives, not after.
My recommended baseline policy:
- 48-hour resolution window: Buyer and seller have 48 hours to resolve the issue through the order messaging thread.
- Admin mediation: If unresolved, either party can escalate. You review the order history and communication.
- Refund or partial refund: If delivery does not match the listed scope, issue a full or partial refund via Stripe. Stripe Connect makes partial refunds straightforward.
- Seller warning system: Two unresolved disputes in 60 days triggers a level review. Three triggers account suspension.
Publish this policy on a dedicated page and link to it from every order confirmation email. Buyers trust marketplaces that are clear about what happens when things go wrong.
The Fees Math: Why Your Marketplace Wins on Price
Here is a real comparison for a $200 gig:
| Fiverr | Your Marketplace (15% commission) | |
|---|---|---|
| Buyer pays | $221 ($200 + 10.5% fee) | $200 (no buyer fee) |
| Seller receives | $160 (80% of $200) | $170 (85% of $200) |
| Platform keeps | $61 | $30 |
Your marketplace is cheaper for buyers and pays more to sellers, and you still collect $30 per transaction. Scale that to 100 monthly transactions and your platform generates $3,000/month in commission revenue. Scale to 500 transactions and you are at $15,000/month, all while running on a $99/year plugin.
The Pro Agency license at store.wbcomdesigns.com/wp-sell-services/ pays for itself in the first two transactions.
Seller Onboarding: How to Set Up Your Vendor Dashboard
The seller experience determines whether your marketplace retains good vendors. A clunky onboarding flow means sellers give up halfway through setup and never list their first gig. WP Sell Services provides a seller dashboard that covers everything a vendor needs without sending them into the WordPress admin backend.
From the seller dashboard, vendors can:
- Create and edit service listings with pricing tiers, delivery time, and revision counts
- View incoming orders and mark work as delivered
- Message buyers through the built-in order communication thread
- Track their earnings and pending payouts via Stripe Connect
- See their current seller level and progress toward the next tier
When you onboard your first 20 sellers, walk each one through the dashboard personally. A 15-minute screen share with each new seller eliminates 90% of early support requests. Sellers who get a personal onboarding call have significantly higher first-gig completion rates than those who are just sent a link and told to figure it out.
Handling Taxes and Compliance on a Multi-Vendor Marketplace
This section is not legal advice, but it is something every marketplace operator needs to think through before launch. On a multi-vendor platform, the tax treatment of your commission income differs from how individual sellers handle their own service income.
A few things to get right from day one:
- Your commission is your revenue. If you collect 15% of each transaction, that 15% is your income. The seller’s 85% passes through to them via Stripe Connect. Your bookkeeping should only track your share.
- 1099-K reporting (US). If your platform processes over $600 in payments for a single seller in a calendar year, you may be required to issue a 1099-K. Stripe Connect handles the documentation for this if configured correctly.
- VAT/GST for international sellers. If you operate internationally, review your obligations with a tax professional before your first international transaction. WooCommerce has EU VAT and tax plugins that can automate calculations at checkout.
- Seller terms of service. Your seller agreement should clearly state that sellers are independent contractors, not employees. This language protects you from misclassification claims.
Choosing a Legal Structure for Your Marketplace
Most marketplace operators run as a single-member LLC or similar entity. The key is to separate your marketplace business from your personal finances from the first transaction. Open a dedicated business bank account, connect it to your Stripe account, and run all platform commissions through it. This makes tax filing cleaner and protects your personal assets if a transaction dispute ever escalates to a legal claim. Consult a local accountant before your first live transaction to confirm your jurisdiction’s specific requirements.
Launch Checklist: First 20 Sellers and 100 Buyers
A marketplace with no sellers is useless to buyers. A marketplace with sellers but no buyers drives sellers away. You need to solve both sides simultaneously at launch.
Getting Your First 20 Sellers
- Recruit manually from Fiverr. Find active sellers in your niche with good reviews. Message them directly offering better payout rates (85% vs Fiverr’s 80%) and no buyer-side fees that suppress order volume.
- Post in freelancer communities. Reddit’s r/forhire, LinkedIn freelancer groups, and Facebook groups for your niche. Be specific about what your platform offers differently.
- Offer zero commission for the first 90 days. New sellers take zero risk. You get listings. After 90 days, they have reviews, orders, and enough momentum to stay even at standard rates.
- Partner with freelance educators. Reach out to people who teach Fiverr or Upwork courses. Offer their students a preferred seller badge if they join your platform.
Getting Your First 100 Buyers
- Target the “Fiverr alternative” search. These buyers are already primed to buy. Write content that ranks for “fiverr alternative own website,” “hire freelancers without Fiverr fees,” and category-specific terms.
- Run a launch promotion. Offer 10% off the first purchase for buyers who join in the first 30 days. This costs you a fraction of one commission but builds your initial review base.
- Use social proof from existing sellers. Before launch, ask your 20 seed sellers to post about their profiles on their own social channels. Each seller drives their own audience to your platform.
- Email outreach to small agencies. Small design, development, and marketing agencies regularly need freelance support. A direct email introducing your marketplace as a vetted freelancer source converts well.
Pre-Launch Technical Checklist
- Stripe Connect live keys active
- Commission tiers configured and tested
- Seller onboarding flow tested end-to-end (register, connect Stripe, create a gig, receive a test order)
- Buyer checkout tested with a real card (Stripe test mode then live)
- Review emails confirmed sending
- Dispute policy page live and linked from footer
- Category pages have descriptions (helps SEO)
- Mobile checkout working on a real phone
- Order notification emails going to admin and seller
- Privacy policy and terms of service updated for marketplace model
Marketing Plan for the First 90 Days
Most new marketplaces try to do everything at once and end up with a thin presence everywhere. I focus on three channels in the first 90 days:
1. SEO Content (Long Game, Starts Day 1)
Write one article per week targeting buyer-intent keywords: “hire WordPress developer without Fiverr,” “find affordable logo designer,” “best Fiverr alternatives for [category].” These posts take 3 to 6 months to rank but compound over time. If you want a model for what that content looks like on this site, check out how we covered moving freelance services away from Upwork to WordPress.
2. Direct Outreach (Fast Traction)
Email 10 potential buyers per day in your target niche. Not a newsletter blast. Personalized emails. “I saw you were looking for a WordPress developer in [group]. We have vetted sellers on [your platform] with pricing starting at $X. No service fees.” This gets responses within days, not months.
3. Seller Promotion Partnerships
Your sellers have an audience. Make it easy for them to promote their gig page. Provide a shareable link, a pre-written Twitter/X post, and a LinkedIn post template. When 20 sellers each share their profile once a week, that is 20 touchpoints per week pointing back to your marketplace at zero cost to you.
WP Sell Services vs Building From Scratch
I get asked this regularly. Why not just build a custom marketplace? Here is the honest answer: a custom marketplace built by a freelance developer will cost $15,000 to $50,000 minimum and take 6 to 12 months. It will still be missing half the features WP Sell Services ships with on day one (Stripe Connect, commission logic, seller dashboards, review system, dispute tools).
WP Sell Services Pro Agency costs $99/year. You can be live with a fully functional freelance marketplace in a weekend. If you want to compare WP Sell Services against other service plugins before committing, we have a full breakdown in our WP Sell Services vs Jetonomy Services vs WC Bookings comparison.
What to Do After Your First 10 Orders
Once real money has moved through your platform, a few things shift:
- Review your commission structure. Are sellers happy? Are buyers completing orders without friction? Adjust based on data, not assumptions.
- Identify your top seller. One seller will likely drive 30 to 50% of your early volume. Build a relationship with them. They are your most valuable asset in the first 90 days.
- Start a seller newsletter. Even a short monthly email covering platform updates, tips for getting more orders, and commission tier progress keeps sellers engaged and reduces churn.
- Track your net take rate. Total commissions collected divided by total GMV. Most healthy marketplaces run at 10 to 20% net take rate. If yours is below 10%, you may be underpricing your value.
If you are already running a service business and want to see how others have structured similar offerings before building a full marketplace, our guide to WooCommerce service packages and hourly rates covers the single-vendor setup that many marketplace operators start with before going multi-vendor.
Start Building Your Marketplace Today
Launching a freelance marketplace like Fiverr on your own website used to require serious development budget and months of build time. With WordPress and WP Sell Services Pro Agency, the technical setup takes a weekend and the economics are better than anything Fiverr offers.
You keep more of every transaction. Your sellers earn more per gig. Your buyers pay less than they would on Fiverr. That is a sustainable competitive position that grows stronger the more sellers and buyers you add.
Get started with WP Sell Services Pro Agency at store.wbcomdesigns.com/wp-sell-services/. The $99/year license covers unlimited sellers and transactions on a single site. Everything you need to launch a freelance marketplace like Fiverr is already in the plugin.