How to Create a Multi-Vendor Service Marketplace Like Upwork


Creating a multi-vendor service marketplace like Upwork allows businesses to connect freelancers or service providers with customers in one platform. With WooCommerce, multi-vendor plugins, and Woo Sell Services, you can build a feature-rich marketplace that streamlines order management, payments, and communication between buyers and service providers.
In this guide, we’ll walk you through the step-by-step process of setting up your own multi-vendor service marketplace using WooCommerce, multi-vendor plugins, and Woo Sell Services.
Why Build a Multi-Vendor Service Marketplace?
A multi-vendor service marketplace benefits both customers and service providers by offering:
- A Centralized Platform – One place for buyers to find service providers.
- Recurring Revenue Potential – Earn commission from every transaction.
- Automation & Scalability – Automate payments, orders, and communication.
- Enhanced Customer Choice – More service providers lead to competitive pricing and better offerings.
Essential Tools and Plugins
To build a robust multi-vendor service marketplace, you’ll need the following:
- WooCommerce – The foundation for your eCommerce service marketplace.
- Woo Sell Services – Adds service-selling features like milestone tracking, order management, and buyer-seller communication.
- Multi-Vendor Marketplace Plugin – Enables multiple vendors to register and list their services. Popular choices include:
- WooCommerce Payment Gateways – Supports multiple payment methods like PayPal, Stripe, or WooCommerce Payments.
- Membership or Subscription Plugin (Optional) – If you want to charge vendors for listing services.
Step-by-Step Guide to Creating a Multi-Vendor Service Marketplace
Step 1: Set Up WooCommerce
- Install WordPress and a reliable hosting plan.
- Install and activate WooCommerce from the WordPress Plugin Directory.
- Configure General Settings, including currency, payment methods, and shipping options (if applicable).
Step 2: Install a Multi-Vendor Marketplace Plugin
A multi-vendor plugin enables service providers to create accounts and list their services. Follow these steps:
- Install and activate Dokan, WC Vendors, or WCFM Marketplace.
- Configure vendor registration settings:
- Allow vendors to register and create service listings.
- Set commission rates for admin earnings.
- Enable vendor dashboards for managing orders and services.
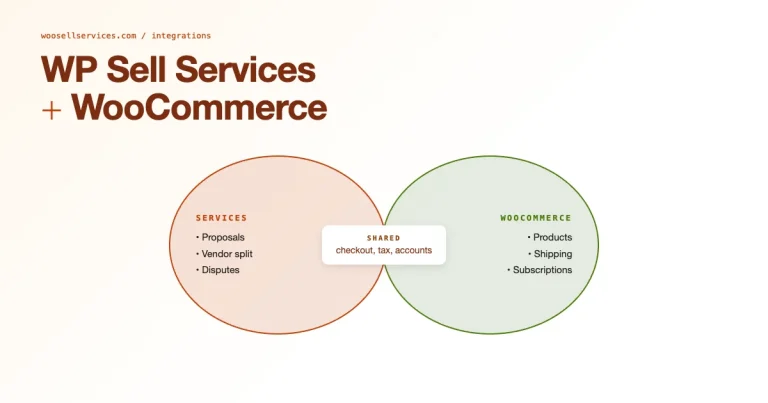
Step 3: Integrate Woo Sell Services for Service Order Management
Woo Sell Services enhances your multi-vendor marketplace by adding service-based features such as:
- Milestone-based service tracking
- Built-in buyer-seller communication panel
- Automated order status updates
- Custom service packages and pricing
Configuration Steps:
- Install and activate Woo Sell Services.
- Enable service milestones, allowing service providers to set up step-by-step project tracking.
- Configure email notifications for service progress updates.
Step 4: Enable Vendor Dashboard and Service Listings
Each vendor needs a personalized dashboard to manage their services. Your multi-vendor plugin should provide a user-friendly dashboard where service providers can:
- List their services with descriptions, pricing, and images.
- Track ongoing and completed orders.
- Communicate directly with customers.
- Manage payments and withdrawals.
Step 5: Set Up Payment and Commission Structure
Your marketplace needs a transparent payment and commission system. Most multi-vendor plugins support different commission structures, such as:
- Fixed Commission – Set a percentage on each transaction (e.g., 10%).
- Tiered Commission – Charge different commission rates based on service pricing.
- Subscription-Based Fees – Charge vendors a recurring fee for using the platform.
WooCommerce Payment Gateways will handle transactions, ensuring secure payments for both vendors and customers.
Step 6: Optimize User Experience with Essential Features
To ensure a smooth experience for both buyers and sellers, consider adding these features:
- Service Reviews & Ratings – Allow buyers to leave feedback on completed services.
- Search & Filtering Options – Help customers find services by category, pricing, or vendor rating.
- Dispute Resolution & Refund Policies – Provide a structured way to handle conflicts between buyers and sellers.
- Automated Email Notifications – Keep vendors and buyers informed about order updates.
Step 7: Launch and Market Your Marketplace
Once your marketplace is set up, focus on attracting both vendors and buyers. Use these strategies:
- Social Media Marketing – Promote on LinkedIn, Twitter, and Facebook to attract service providers.
- SEO Optimization – Optimize service listings and blog content for search engines.
- Paid Advertising – Use Google Ads or Facebook Ads to drive traffic.
- Affiliate & Referral Programs – Offer incentives for users who bring in new vendors or customers.
Step 8: Monitor and Scale Your Business
Regularly track your marketplace’s performance using WooCommerce analytics. Key metrics include:
- Number of active vendors
- Total service orders completed
- Revenue generated from commissions
- Customer retention and satisfaction levels
As your platform grows, consider expanding by adding more service categories or integrating additional features like AI-powered recommendations and live chat support.
Conclusion
Creating a multi-vendor service marketplace like Upwork is a great way to build a scalable business that connects service providers with customers. With WooCommerce, multi-vendor plugins, and Woo Sell Services, you can easily develop a feature-rich, automated platform.
Start your multi-vendor service marketplace today and provide freelancers and businesses with a seamless service-selling experience.
Interesting Reads:
Best Payment Gateways to Sell Services Online Using WooCommerce